|
LINKS:
Using
Calipers
Using Thread Guage
|

|
The lab is intended to accomplish five goals:
-
To introduce the basic tools used in manufacturing shops and
their related terminologies to the students.
-
To learn the importance of tolerance and dimensioning in
manufacturing.
-
To practice the team work concept and basic design elements
through a hands-on practice that will produce a product.
-
To practice the safety and other rules related to working in
a manufacturing shop floor.
-
To provide an experiment through which students recognize
the level of skills and time needed for the manual jobs.
|
Manufacture:
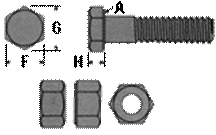
a hex thick slotted nut and its associated bolt (no bolt head necessary
for this assignment).
Stock: a
rod (whose diameter and material type will be detremined during class) for the nut and a smaller diameter rod
of the another material for the bolt depending on your choice of the
nominal size slotted nut.
Tools & Equipment:
hacksaw, files, vise, Vernier caliper, micrometer, blue dye, scribe,
protractor, punch, drill press, thread gage, tap and die set, tapping
oil.
Instructions:
Please make sure that you have read the lab work rules and
regulations before you start working in the lab. It is important that
you follow these instructions in order to obtain the maximum points
allowed for this assignment.
-
Use the
Table for the Standard of Hex Thick Slotted Nuts
and identify a
nominal size nut that your team wants to produce.
-
Identify the dimensions of the nut that you are planning to
manufacture. Submit a sketch drawing of your specs and a request
for the size of stock needed. Only after your
plan is approved, may you start.
-
Cut a length equivalent to 125%-150% of the nominal size of
the nut that you are planning to make.
-
File the piece to proper size (height of the nut plus some more for
finish up work).
-
Use the blue dye and scribe to draw a hexagon on one end of the work
piece. The dimensions should be from your original plan.
-
File the sides to create the hexagon shaped nut.
-
Drill a hole through the center of the nut and use the tap to create
a
threaded hole for the nut.
-
Cut a 1.5 - 2.0 inch length from the smaller diameter rod. Deburr it and
use the die set to create the related (matching size) bolt.
-
Submit your project by the due date. The produced part should be
submitted separately in a plastic bag with the original approved
sketch, and list of team members in it.
-
Reserve a presentation time to present your project.
Your grade for this assignment is a combination of some general
evaluation guidelines and some specific ones related to this assignment.
General Guidelines
-
How well the team worked together.
-
Whether the team members observed the safety rules, and other rules
as explained in the Lab Work document.
-
Whether the team progress was on a uniform basis or most of the work
was done at the end.
-
Whether the team followed the rules set for the lab work or not.
-
The quality of the report, presentation, and demonstration.
Specific
Guidelines
How well the
dimensions of the final product agree with the proposed part.
HINTS:
How will you find the center?
How will you determine the amount of material to
take off the sides?
|
Related Topics Hacksaw
Files Nut Specifications
Tap & Die
Finding the Center
Drill Bits
Flutes
Vise
Hammers
Safety |


